A list of some of the best video converters
With advancements in technology, video conversion is becoming a very common practice. Gone are the days when video conversion was something just for professional videographers or filmmakers. No matter if you work in a studio or just edit videos at home, you must know how to convert videos from one format to another.
People may want to convert their videos because:
- Some video formats are more preferred over others in some cases. For example, YouTube prefers that the uploader uploads videos in MP4 format ensuring faster uploads.
- Some platforms only accept videos in certain video formats.
- Every video format has its pros and cons.
- Some edits and compressions are particular to one video format.
While many video converters are available in the market that claims to get this job done, only a few of them are fast and reliable. Here, we will have a detailed look at some of the best and reliable video converters that you can download along with their pros and cons. So let’s get started without further ado.
First things first, what are video converters?
Video converters are computer programs or softwares that can change the storage format of digital videos. They convert a video using any one of the two methods. Either that may recompress the video to another format in a process called transcoding, or they may simply change the container format without changing the video format.
Converting your videos using VLC Media Player
Probably, one of the most popular media players that you might already have installed on your system is the VLC media player. With the ability to work both as a media player and a lightweight video editor and converter, the VLC media player is our go-to choice.
About: VLC is a free and open-source cross-platform multimedia player and framework that plays most multimedia files as well as DVDs, Audio CDs, VCDs, and various streaming protocols. It can convert to a variety of video formats and codecs and supports a variety of them.
How to:
- Visit this link to get the VLC media player downloaded to your system.
- Once the VLC media player is successfully downloaded and installed, click on it to open it.
-
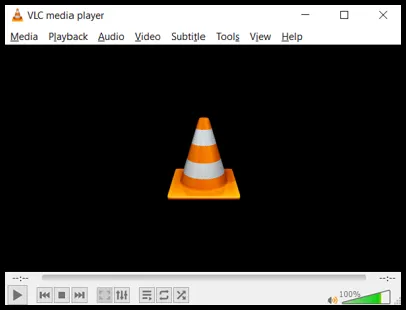
You should see something like this once it opens up:
- Click on Media.
- Choose Convert / Save… from the drop-down menu that opens.
-
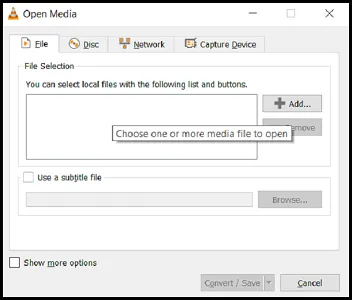
A new window will open up looking something like this:
- Click on Add….
- Choose the video file that you want to convert.
- Click on Convert / Save.
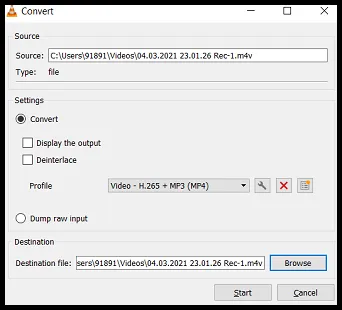
- The Convert dialogue box will open up.
- Click on the Settings icon next to the drop-down menu of Profile.
- Choose your video format and hit Save.
- You can also choose the audio and video codecs.
-
Click on Browse and choose a file destination where your newly converted video file will be saved.
- Once you have chosen the location, hit Start.
- Your video file will now be converted. The time taken for conversion will be proportional to the video’s file size.
- Once done, you can find your converted video file in your chosen location.
Pros of the VLC Media Player:
- Easily available.
- Safe and reliable.
- Works offline too.
Cons of the VLC Media Player:
- Does not have a very great UI.
- Limited conversion options.
Converting your videos using HandBrake
Another option for Windows as well as Linux users is to convert their video files using HandBrake. It is an open-source software that is completely free and comes packed with some top-notch powerful specs.
About: HandBrake is a tool for converting video from nearly any format to a selection of modern, widely supported codecs. Not only can it convert and compress videos, but it is also free and open-source. It is available on multiple platforms such as Windows, Mac and Linux.
How to:
- Hit on the following link to download HandBrake for your machine.
-
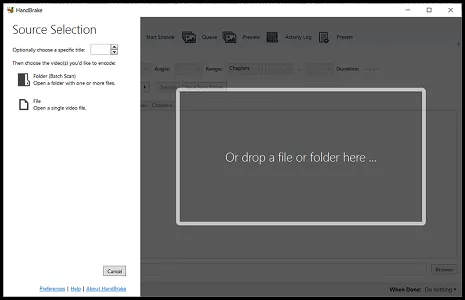
Once it is successfully downloaded and installed, you should see an interface resembling this when you open the app:
- Click on File to open a single video file that you want to convert.
- In the Summary tab, select the format that you want from the drop-down menu next to Format.
-
You can further choose to optimize your video by doing the following.
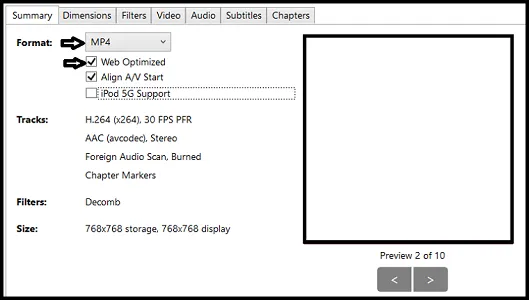
- Go on the Video tab and make sure that the video codec is H.264.
- Select “Same as source” in the drop-down menu next to Framerate (FPS).
- If you wish, you can also switch to Constant Framerate from Variable Framerate.
- Go on to the Audio tab and make sure that the codec is AAC(avcodec).
- Finally, click on the Browse button in the bottom-right corner of the app to select a location where your optimized video will be saved.
- If you want to convert your video to a MOV file, save the filename with an extension of .mov.
-
Click on the Start Encode button present at the top to start the encoding process.

- You can find your compressed video in the same location which you selected earlier for saving your video.
Pros of HandBrake:
- It is open-source like the VLC media player and hence safe to use.
- It comes with many other presets to optimize the video.
- Works offline and is not dependent on a steady internet connection.
Cons of HandBrake:
- Its UI can be a bit overwhelming.
- Very limited video formats are available for conversion.
Converting your videos using Freemake Video Converter
Freemake Video Converter, as its name suggests, is a free video converter software that allows you to convert your videos with ease.
About: Freemake Video Converter is a free video converter without any trials or limitations and is available on multiple platforms such as Windows, Blackberry, Sony PSP and more. It also comes with a small editor to cut and trim the videos and edit them. Freemake video file converter supports all popular & rare non-protected formats incl. MP4, AVI, MKV, WMV, MP3, DVD, 3GP, SWF, FLV, HD, MOV, RM, QT, Divx, Xvid, TS, MTS, Fraps.
How to:
- Download the Freemake Video Converter from here.
-
Once it opens, you should see an interface like this:
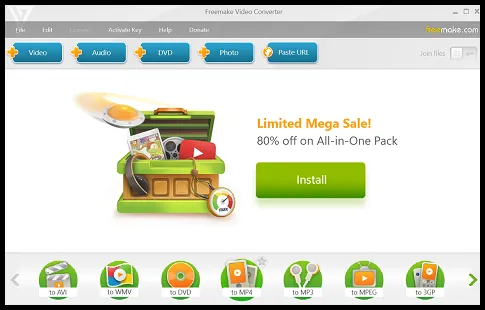
- Click on Video.
- Choose the video that you want to convert.
-
Choose the format that you want to convert to from the bottom toolbar.

-
A new conversion window will open up looking something like this:
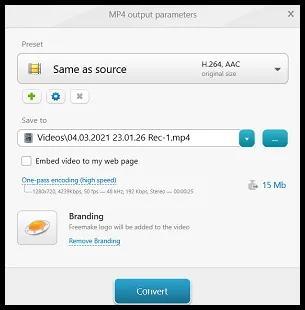
- You can also choose a default preset from the drop-down menu of Preset.
- Or you can click on the settings icon to edit the preset according to your choice.
- Once you have selected your preset, click on the Convert button.
- If prompted, click on Continue with logo.
- If you want to remove the logo, you must upgrade to a paid subscription.
- Once your video is successfully converted, you can find it in the downloads of your local machine.
Pros of Freemake Video Converter:
- Has an efficient UI.
- Easy to use.
- Fast and reliable.
Cons of Freemake Video Converter:
- Adds watermark in the free version.
- Limited options to convert.
Converting your videos using Any Video Converter
Any Video Converter is a free video converting software that allows you to convert your videos to a wide variety of supported formats effortlessly.
About: Any Video Converter is a free and safe software to convert your videos from one format to another. Along with the video converter, it comes with a CD / DVD burner, a video editor, and a video downloader. Its speciality is that it includes NVIDIA NVENC accelerated encoding ensuring faster changes in codecs. The supported video formats include MP4, MPEG, VOB, WMV, H264, H265, 3GP, 3G2, MKV, MOD, M2TS, RMVB, AVI, MOV, FLV, F4V, DVR-MS, TOD, DV, MXF, OGG, WEBM, any 4K video format and more. It is available on Windows, macOS and Linux devices.
How to:
- Click here to download Any Video Converter on your system.
- Once it is successfully downloaded and installed, open it.
-
You should be greeted with an interface resembling this when it opens:
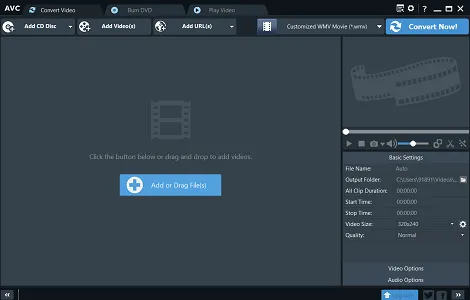
- Click on Add or Drag File(s) button to select the video files that you want to convert. If you select more than one file, all will be converted to the same destination format.
- You can also just drag and drop the files that you want to convert.
- Once you have selected the video file that you want to convert, choose the format that you want to convert it to.
- This can be done by clicking on the drop-down menu on the left to the Convert Now! Button and selecting the desired format.
- Finally, click on the Convert Now! Button and wait for your conversions to complete.
- Once it is completed, you can find the converted video in the same file location where the original video is.
- After a successful conversion, Any Video Converted will auto-close itself.
Pros of Any Video Converter:
- NVIDIA NVENC accelerated encoding.
- HVEC / H.265 conversion.
- Ability to convert in 4K resolution.
- Ability to burn CD/ DVDs.
Cons of Any Video Converter:
- Can be a bit slow at times.
Converting your videos using NCH Prism
NCH provides a free video converter called the Prism Video Converter which a stable and comprehensive multi-format video converter.
About: Prism video converter is a freemium video converter that is very stable and easy to use. Prism converts AVI, MPG, VOB, ASF, WMV, MP4, AMV and all video formats that have a DirectShow based codec. It also comes with a video compressor to compress the output videos. The user can either convert one video file at a time or convert multiple video files at the same time. The best thing about Prism Video Converter is that it allows the user to see a preview of what the output video file will look like before the conversion is even completed. It is available for Windows and macOS.
How to:
- Click here to download the Prism Video Converter on your system.
-
Once it is successfully downloaded and installed, you should see an interface like this:
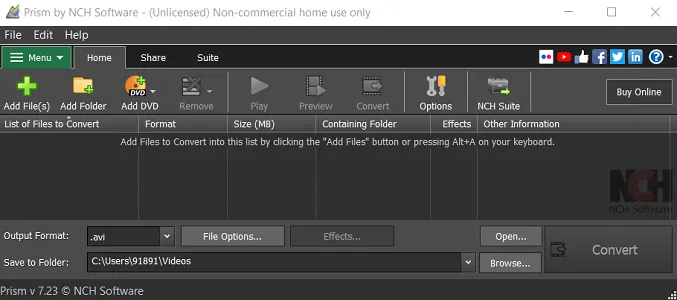
- Click on the Add File(s) button present in the top-left corner and select the video file/ files that you want to convert.
- If you select more than one file, all will be converted to the same destination format.
- Click on the drop-down menu next to Output Format and select the desired output format.
- You can also adjust the compressor settings by clicking on the File Options… button.
- Once you are satisfied with your settings, click on the Convert button and your video file/files will start converting.
-
Once converted, you will hear a beep and the converted video will be saved to the destination that was entered in the Save to Folder box.

- If you want, you can change the saved file location before the conversion by clicking on the Browse… button and selecting another appropriate file destination of your choice.
Pros of Prism Video Converter:
- A lot of options to convert to.
- Very simple and easy to use.
- Is fast with conversions.
- Comes with a built-in compressor and editor.
Cons of Prism Video Converter:
- Some features are paid although the conversion is free.
- Not available on Linux.
Converting your videos using Gihosoft Video Converter
Gihosoft Video Converter is a very simple and easy to use video converter which allows you to convert video formats, save YouTube videos, burn videos to DVD and transfer videos to Android/iOS devices.
About: Gihosoft video format converter empowers users to convert videos to MP4, AVI, MKV, MOV and more at a blazing fast speed, so you can easily change video formats. This video converter can not only convert HD video files but also download a single video, playlist, channel or subtitle from YouTube.
The supported output formats include MP4, AVI, WMV, MKV, MOV, FLV, SWF, WEBM, ASF, 3GP. It is available for Windows and macOS.
How to:
- Click here to download Gihosoft Video Converter for your system.
-
Once it is successfully downloaded and installed, you will see an interface resembling this when it opens:
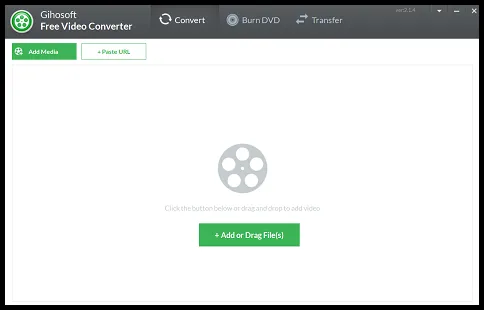
- Click on + Add or Drag File(s) and choose the video file/files that you want to convert.
- If your video file is on the web, you can copy its URL and click on the +Paste URL button present at the top.
- Once you have selected your video file/files, choose the format that you want to convert it to.
- Once you have chosen your format, select the preset you want. If you want it to be in the original preset, click on Same as input.
-
Finally, click on Convert.

- Your video file/files will be saved to the file location that was entered in the Output Folder box.
Pros of Gihosoft Video Converter:
- Simple and easy to use.
- Enough options to convert.
- Ability to paste URL from the web.
Cons of Gihosoft Video Converter:
- Takes some time.
- Although there are enough output formats, there could have been more.
Converting your videos using Converter365
Converter365 is a tested and safe online video converter to use. The developers of this online tool claim that: ”With this video converter, all your files and personal information are safe. We don’t store any of your data. All uploaded pieces of information and documents are deleted in less than a minute after you download them. Also, you keep all copyrights and ownership of any file converted with our free online tool.”
About: Converter365 is an online video converter specially created for any video format conversion. It’s free, easy to use, and with the best possible conversion quality. It does waste any time downloading additional software and converts your video files online from current to popular video formats and makes them available on every desktop, iOS and Android device.
How to:
- Click here to open the safe online video converter by Converter365.
-
Click on Add Files and choose the video file that you want to convert from your local machine.

Alternatively, you can click on Add From URL if your video lies on the internet.
- After you have chosen the video that you want to convert, select the media file format that you want to convert it to.
- Click on the drop-down menu next to Convert to and select your desired format.
- Currently, the supported media file formats include a variety of formats ranging from 3G2 to MP4.
- You can also click on Settings to change the audio and video codecs, change the aspect ratio, remove audio and many more.
- Once you are done setting the parameters, click on Start conversion.
- Your file will now start uploading and then the conversion will begin.
- The time taken for uploading and conversion will be proportional to your file size.
-
Once it is converted, click on the Download file button to save the file to your local machine.

- The converted file will be made available for the next 24 hours and can be opened by sharing the link in Copy link and share.
Pros of Converter365:
- Very safe and easy to use.
- Ad-free.
- Has a wide menu of supported media file formats.
- Can be shared directly using the link.
- Can be downloaded as zip files.
Cons of Converter365:
- The uploading process is somewhat time taking.
Converting your videos using video converter by FreeConvert.com
You can safely convert your videos using a free online video converter provided by FreeConvert.com. It is easy and safe to use. Its developer claims that its Video Converter is free and works on any web browser. They guarantee file security and privacy. Files are protected with 256-bit SSL encryption and automatically deleted after 2 hours.
About: The Online Video Converter by FreeConvert.com lets you convert videos in the highest quality. You can adjust video bitrate, resolution, and many other settings to achieve the best video quality. Convert more than 60 video formats to popular video extensions such as MP4, MKV, WebM, AVI, and more.
How to:
- Click here and open the online video converter on your favourite browser.
-
Click on Choose Files and choose the video that you want to convert.

You can choose the video files from your Dropbox, Google Drive or your local machine.
- By default, your video file can be of a maximum size of 1GB. To upload larger video files, you need to upgrade to a premium account.
- After you have chosen the video file that you want to convert, select the desired video format from the drop-down menu next to Convert to.
- You can also click on the Settings icon to change the video codec, aspect ratio and tweak a variety of properties.
- Once you are done setting the parameters, click on Convert To “Your desired file format here” to start the conversion.
- Your video will now be uploaded and converted. The time taken for this will be proportional to the video file size.
-
After it is successfully converted, click on the Download button to download your video.

- You can find the downloaded video in the downloads of your local machine.
Pros of video converter by FreeConvert.com:
- Very safe with 256-bit SSL encryption.
- Easy to use.
- Various upload and download options.
Cons of video converter by FreeConvert.com:
- Allows a maximum upload size of only 1GB in the free version.
Converting your videos using video converter by 123Apps
123Apps provides a free online and safe video converter that converts video files, allowing you to change the video format, resolution or size right in your browser. It is safe to use as your files are automatically deleted from the servers a few hours after you are done working with them. Nobody has access to them except you.
About: The Video Converter by 123Apps is a free video converter that supports more than 300 file formats and the number keeps growing. It also supports various codecs such as H265 and HVEC. It allows uploads to 4GB of maximum file size and guarantees high-performance conversion by making use of its powerful servers.
How to:
- Click here to open the video converter by 123Apps.
-
Click on Open file and choose the video file that you want to convert.
You can also upload it from your Google Drive, Dropbox or a URL if your video is on the internet.

- Choose the desired format that you want to convert to and wait till your video file uploads to the servers.
- You can also change the resolution or keep it the same as the source.
-
Hit the Settings button to change the audio and video codecs, file compression and more.

- After your video file is uploaded and you have adjusted the parameters, click on the Convert button.
- Your video will now start converting really fast. Once it is done, click on Download to download it to your local machine.
Pros of video converter by 123Apps:
- Completely free and safe to use.
- Comes with a built-in compressor.
- Really fast when compared to other converters.
- User friendly and ad-free.
Cons of video converter by 123Apps:
- Limits the upload size to a maximum of 4GB. Although, in our opinion, 4GB is more than enough.
Converting your videos using video converter by Online-Convert.com
Online-Convert.com hosts a free service to convert a variety of things such as audio, images, documents, and of course videos. You have an option to search for supported file types or contact the developers directly if you need any assistance. It is also available as an extension for Google Chrome and Firefox. Its developers assure file safety and anonymity.
About: This free online file converter lets you convert media easy and fast from one format to another. It supports a lot of different source formats. If you can’t find the conversion you need, you can let the developers know by writing them an email and they will get back to you.
How to:
- Click here to visit the online converter.
- You will find a wide variety of converters such as Audio Converter, Document Converter and more.
- Look for Video Converter and select the destination file format from the drop-down menu saying “Select target format…”.
- Hit Go.
- Click on Choose Files and choose the video file you want to convert. You can also upload it from your Google Drive, Dropbox or a URL if your video is on the internet.
-
Alternatively, you can drag and drop your files inside the green box of the converter.
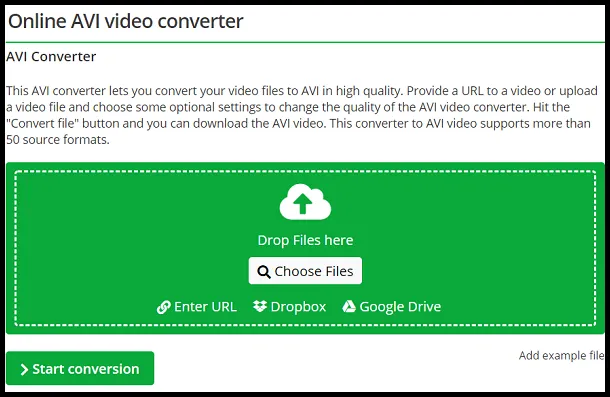
- You can also tweak a variety of parameters that will enable you to change the aspect ratio, trim the video, compress the video, change the codec, flip or mirror the video and many many more.
-
Once you are done uploading your file, click on Start conversion to begin converting your video file.

- The conversion will start and take a few seconds or minutes depending on the file size. Once it is done, it will automatically be downloaded.
- If the download does not start automatically within a few seconds, you can always download it by clicking on the Download button.
- You can also choose to download your converted video as a ZIP file.
Pros of video converter by Online-Convert.com:
- Easy to use.
- Completely ad-free.
- Variety of options to edit the video file.
Cons of video converter by Online-Convert.com:
- The UI can be a bit overwhelming.
- Although it is safe to use, it requires cookies.
Converting your videos using CloudConvert.com
The free online video converter by CloudConvert allows you to convert your video file to your desired format within just a few clicks and taps. It is completely safe to use as CloudConvert has been trusted by the users and customers since its founding in 2012. No one except you will ever have access to your files. The developers claim that they earn money by selling access to their API, not by selling your data.
About: CloudConvert is an online file converter. It supports nearly all audio, video, document, ebook, archive, image, spreadsheet, and presentation formats. It also provides API to implement the converter on your own website and uses open-source software under the hood. It has also partnered with various software vendors to provide the best possible results.
How to:
- Click here to open CloudConvert on your machine.
-
Select the current file format and destination file format from the drop-down menu next to convert and to respectively.

- Or you can click on Select File and choose the video file you want to convert. It will automatically detect the current file format.
- Choose the destination file format by clicking on the drop-down menu next to Convert to and hit Convert.
- You can also click on the Settings icon to change the resolution, video codecs, aspect ratio and many more.
-
Once your video file is converted, click on the green Download button to download it to your local machine.

Pros of video converter by CloudConvert:
- Easy to use.
- Very safe and reliable.
- Completely ad-free.
- Variety of options to edit the video file.
Cons of video converter by CloudConvert:
Can be a bit slow sometimes.
In conclusion, these were some of the most popular and efficient video converting softwares available both online and offline. Hope you try them out.

